How to Make Vegan Honee
Make your own inexpensive vegan honee with just three simple ingredients!
Ingredients
- 800 g (4 c) Vegan Sugar (I use Zulka brand)
- 1,920 g (8 c) Apple Juice (I use Aldi's Organic brand)
- 4 Chamomile Tea Bags
Instructions
-
Add 800 g (4 level cups) of vegan sugar to a large saucepan.
-
Add 1,920 g (8 cups) of apple juice. Weigh or measure your juice, even if the bottle says it contains 8 cups. There is usually a bit extra in the bottle, and that bit is enough to make your honee too thin.
-
The keys to getting the right honey consistency are to weigh your sugar and juice, and to cook your honee until 1,360 g of water have been evaporated from the mixture. To do this, you need to know how much it weighs at the start. Turn on your scale and add a hot pad, then place the full saucepan on the scale. You want the combined weight of the hot pad and the full pot. Write down the weight. Now, subtract 1,360 g from your starting weight, and circle the number. This is your target weight.
-
Place your saucepan on a burner or induction cooktop, and heat on medium-low heat while stirring continuously until the sugar is completely dissolved. This takes about five minutes.
-
The key to the perfect honey flavor is steeping chamomile tea in your hot mixture for the right amount of time. I like to use four tea bags and boil the mixture gently for 30 minutes. Looping the tags around your pot handle keeps them from falling in. (Make sure the tags are nowhere near the flame, however, if you have a gas burner!) Bring the mixture to a low boil, then boil gently for 30 minutes, stirring every ten minutes just to be sure there is no scorching on the bottom of your pan. Remove the tea bags.
-
Now, you need to continue cooking the mixture until the right amount of water has evaporated. You will also want to give it a stir about every 20 minutes during this time. (I turned on a stopwatch to see how long this took for those without a scale, and it ended up being two hours and six minutes.)
-
For those with a scale, I would start checking the weight after about one hour and forty-five minutes. To do this, turn your scale on, put the hot pad on the scale, and then the saucepan. Check every few minutes when you are getting close to your target weight. Remove from the heat once you hit the target weight.
-
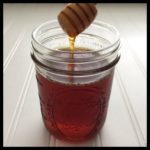
You will see that your honee reduced quite a lot from the start. It will still be pretty thin, but will thicken some as it cools and then much more as it chills in the fridge. This is why you can’t judge the doneness by appearance, and why using a scale is so helpful!
-
Once your honee has cooled sufficiently to not risk burning yourself if it spills, pour it into clean jars and put them in the refrigerator. (Your honee will scantly fill three pint-size mason jars.)
-
Allow your honee to chill for several hours before using as this will allow it to thicken to the right consistency. You will have four cups of beautiful vegan honee! Keep your honee in the fridge, and it will last for several months.
Recipe Notes
- For consistently good results, you will need a digital kitchen scale for this recipe. If you do not have one, read my post on Why You Should Use a Kitchen Scale. You can make the honee without a scale, but there is a good chance it will be too thin or too thick. This only really matters if you will be baking with your honee, so you’ll have to decide how important the right consistency is for your use.