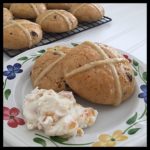
Vegan (& Gluten Free) Hot Cross Buns
Marked with a cross, these traditional spiced buns are lightly sweetened and full of citrus zest and dried fruit. They are vegan, gluten free, fluffy, and delicious!
Ingredients
- 450 g (3 1/2 c) Gluten Free Flour Blend (made with The Plant Based Egg)
- 2.0 g (3/4 tsp) Cinnamon
- 1.0 g (1/2 tsp) Cardamom
- 0.6 g (1/4 tsp) Nutmeg
- 4.0 g (1 tsp) Vegan Sugar
- 11.4 g (1 TBS + 3/4 tsp) Yeast (Quick Rise or Active Dry)
- 360 g (1 1/2 c) Seltzer Water
- 75 g (3/8 c) Vegan Sugar
- 14 g (1 TBS) Vegan Butter (I use Earth Balance)
- 20 g (4 tsp) Distilled Vinegar
- 9.6 g (1 1/2 tsp) Salt
- 3.8 g (3/4 tsp) Vanilla Extract
- 4.5 g (1 TBS) Lemon Zest
- 4.5 g (1 TBS) Orange Zest
- 70 g (1/2 c) Raisins
- 40 g (1/3 c) Gluten Free Flour Blend
- 45 g (3 TBS) Water
- 85 g (1/4 c) Orange Marmalade
Instructions
-
Line a half-sheet baking pan with parchment paper, then set it aside.
-
Add the 450 g (3 1/2 c) of your flour and the spices to a large mixing bowl. Stir together to combine. (This recipe was developed using flour made with The Plant Based Egg, and I do not know how a flour without it will perform. See the recipe notes for more information.)
-
Make a well in the center of the flour and spice mixture, then add the yeast and the 4 g (1 tsp) of vegan sugar to the well.
-
Warm the seltzer water to 118 degrees Fahrenheit. (Be sure to stir the water before checking the temperature as hot spots can occur.) Pour the warm seltzer water into the well with the yeast. Let stand for five minutes until the yeast is nice and bubbly.
-
Stir together with a sturdy spatula or a large spoon. The dough will be quite firm.
-
Add the salt, vanilla, vinegar, vegan butter, lemon zest, orange zest, raisins, and the rest of the sugar. Just let them all sit on top of the dough, and do not stir them in.
-
Place the bowl into the clean plastic bag, twist the bag to close it, and tuck the end under the bowl. Place the bowl (inside the bag) in a warm place to rise. (You want the room temperature to be at least 70 degrees Fahrenheit, and no warmer than 85 degrees Fahrenheit.) If your house is cooler than 70 degrees, you can use your oven with the light turned on, but check the temperature inside to be sure it isn’t above 85 degrees. Set a timer for 30 minutes.
-
After 30 minutes, undo the bag and fold it back. The dough will be puffy. If you are using a hand mixer with dough hooks, beat on high speed for three minutes. If you are using a stand mixer with a paddle attachment, beat on medium-high speed for two minutes. Scrape down the bowl, then place the bowl back in the bag as before. Let the dough rise for an hour if the room is around 70 degrees Fahrenheit, and for 40 minutes if it is close to 85 degrees. (Use a time in between for a temperature in the middle.) Set a timer so you remember!
-
The dough will be quite puffy now. Stir the dough down with your spatula or spoon, then pinch some of the dough between your fingers. It may be too soft and sticky to shape easily. If so, you are going to add more flour, a little at a time, just until the dough is shapeable. Knowing exactly how stiff the dough needs to be really comes from experience, but you want it to be only just stiff enough to be able to shape easily. If you add too little, the dough will be too soft to work with. If you add too much, it will not rise sufficiently. (Err on the side of too little until you get the feel what the dough should feel like, because it is better to have your rolls spread out too much but still be fluffy, than it is to have them not rise enough and be doughy.)
-
When you have added enough flour, the dough will not stick to the bowl anymore, and you will be able to easily shape a ball of dough (gloves make this much easier!) Divide the dough into twelve equal pieces. I use a scale to be sure they are equal as this ensures even baking later. Tip: weigh your bowl before you add the flour at the start of the recipe and write down the weight. Then, when you are ready to divide the dough, weigh the bowl with the dough, subtract the weight of the bowl, and divide by twelve. That is how much the dough for each roll should weigh. Zero the scale, and remove the right amount of dough for one roll.
-
To shape each piece of dough, roll it into a ball in your lightly greased hands (gloves make this step even easier). Hold the ball in one hand and slightly flatten it with the other. Place on the lined pan. Repeat until all twelve rolls are shaped.
-
Carefully place the pan with the shaped pieces of dough into the plastic bag. Puff it up and then tuck the edge under the pan. The plastic should form a dome over the rolls. Your rolls will only need to rise for 15 to 20 minutes if your room is 85 degrees Fahrenheit, but will need 30 to 45 minutes if your room is 70 degrees Fahrenheit, and somewhere in between if your room temperature is in the middle.
-
Preheat your oven to 400 degrees Fahrenheit while they are rising. (You will not be able to use it as a place for rising your dough this time.) Place the shallow pan on a lower rack and add about a 1/4″ layer of water. Keep an eye on the water level if your rising time is over 30 minutes as you may need to add more.
-
While you are waiting for your rolls to rise, mix the 40 g (1/3 c) of flour with the 45 g (3 TBS) of water. Add the flour mixture to a sandwich baggie (this is easier to do if you fold the top of the bag over and roll down the sides of the bag), squeeze the air out and seal the bag. Set it aside for now.
-
Your risen rolls are ready when they are light and puffy, but not cracked. Check your pan in the oven to be sure there is still at least 1/8″ of water in the pan. Add more water if needed.
-
Cut off a little bit of one corner of the bag with the flour mixture, and carefully pipe a cross onto each bun.
-
Bake the rolls for 24 to 28 minutes at 400 degrees Fahrenheit, until they are golden brown. Note: You only need steam for the first 10 to 15 minutes, so don’t add more water while the rolls are in the oven even if the pan runs dry while they are baking. It also doesn’t matter if there is still water left in the pan the entire baking time. Don’t open the oven door once the rolls are in until they are done!
-
While the rolls are baking, heat up the marmalade and strain out the pieces of zest. When your rolls are done, brush them with the strained marmalade.
-
Let the rolls cool until they are only just still warm, then serve as desired.
-
Place any leftovers into a Ziploc bag and freeze for up to three months. It is best to freeze any rolls that you won’t eat the same day. To defrost a roll, place it in the microwave (out of the bag) and heat for 1 1/2 minutes at 50% power. Turn the roll over, then heat for another 1 to 1 1/2 minutes at 50% power. The rolls are best served warm.
Recipe Notes
- See my post on 16 gluten free flour blends and choose the blend you want to use. Blends one and two are great for other baked goods, but should not be used for yeast breads. Any of the blends three through sixteen will work well in this recipe. (You can also use my premade GF flour blend once it is available to purchase.)