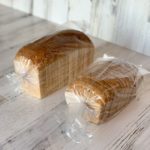
Fluffy Vegan & Gluten Free White Sandwich Bread - Medium Loaf
Make a beautiful, soft, and fluffy loaf of vegan and gluten free bread in a 9" x 4" x 4" Pullman pan or a standard 9' x 5' loaf pan. No xanthan gum, guar gum, or eggs are needed to make this amazing bread!
Ingredients
- 675 g Freely Vegan Gluten Free Flour (or DIY flour made with The Plant Based Egg)
- 2.3 g (1/2 tsp) Vitamin C Crystals
- 6.0 g (1 1/2 tsp) Vegan Sugar
- 12 g (4 tsp) Active Dry or Quick Yeast
- 600 g Seltzer Water (plain carbonated water)
- 14.4 g (2 1/4 tsp) Salt
- 38 g Vegan Sugar
- 21 g Vegan Butter (I use Earth Balance Spread)
Instructions
-
Add the vitamin C crystals and room-temperature flour to a large mixing bowl, then whisk them together. (Leave out the vitamin C crystals if you will be using lemon juice and vinegar instead.)
-
Make a well in the flour, then add the smaller amount of sugar and the yeast to the well. You can use either quick rise or active dry yeast in all of my bread recipes.
-
Warm your seltzer water to 80 degrees Fahrenheit. Use a thermometer to verify the temperature. If it is 74 degrees or more in your kitchen, just use room temperature seltzer water. Pour the seltzer water into the well, then set a timer and wait five minutes to let the yeast get bubbly. (For using lemon juice and vinegar instead of vitamin C crystals, decrease the amount of seltzer water to 570 grams, and add 15 g of lemon juice and 15 g of distilled vinegar to the water in the well after the yeast gets bubbly.)
-
Stir the liquid into the flour until you have a uniform dough. Make a well in the dough, then add the larger amount of sugar, the salt, and the vegan butter to the well. DO NOT stir them in yet! Place the bowl into a clean trash bag, twist the end, and tuck it under the bowl. Set a timer for one hour. Grease and flour your 9 x 4 x 4 inch Pullman pan or a standard 9" x 5" loaf pan while you wait. This is an essential step, even with pans that are supposed to be non-stick. You want your loaf of bread to turn out of the pan easily, and the flour really helps the dough to rise up the sides of the pan properly.
-
When your timer goes off, use a hand mixer with dough hooks to mix the dough for one-and-a-half to two minutes on medium speed just until the sugar, salt, and vegan butter are incorporated evenly into the dough. Use a sturdy spatula to scrape the bottom and sides of the bowl. Mix the dough by hand several times to be sure you adequately mix in the dough that was on the sides and the bottom of the bowl.
-
Scrape the dough into your greased and floured pan. Spread it out evenly, being sure to press it into the corners. Place the filled loaf pan into your plastic bag. Set a timer for 20 minutes so you can check the rise. The length of time it takes will vary from 20 to 50 minutes or so, depending on the temperature and humidity in your kitchen. Keep a close eye on the rise after 20 minutes as it can go from not ready to over-proved very fast.
-
As soon as the pan is in the bag, pour water into the pan you should already have on the bottom rack of your oven for this purpose. Turn your oven on to 400 degrees Fahrenheit to preheat while your dough is rising. If your dough takes more than 25 to 30 minutes to rise, top off the water level in the pan. The water needs to be at least a 1/4" deep when you put the bread in the oven.
-
Your dough has sufficiently risen when the middle of the dough is just to the top of a Pullman pan, or about 1/2" to 3/4" above the top of a standard loaf pan when viewed from eye level. There should also be a few small bubbles starting to pop on the surface of your dough.
-
Place your pan in the middle of your hot, steamy oven. Immediately reduce the oven temperature to 375 degrees Fahrenheit, and set a timer for 80 minutes. Keep the oven door closed until there are only 10 to 15 minutes left on your timer. Then, you can check how brown your loaf is getting. Cover very loosely with foil for those last minutes if your loaf is getting too dark.
-
When your timer goes off, remove your bread from the oven. Gently slide your loaf out of the pan on its side onto a cooling rack. Set a timer for 10 minutes, and turn the loaf onto the opposite side when it goes off. Do the same for 20 minutes, then 30 minutes. After that, you can stand your loaf upright to finish cooling completely.
-
Wait until your loaf is completely cool to slice it. This will take at least three hours. I recommend slicing and eating your bread as soon as it's completely cool, and not waiting any additional time after that. Homemade bread without preservatives starts to stale immediately, whether it's gluten free or made with wheat flour. Slice, and then eat or freeze your loaf as soon as you can after it's cool for the best quality.
-
Package your sliced bread in a plastic bag, store it in the freezer, and remove slices as you need them. I recommend either toasting your bread slices or defrosting them in the microwave on 50% power. You can make frozen bread soft and fresh again by warming it up and then letting it cool to room temperature. Eat your defrosted bread right away, though, or it will start to harden.
Recipe Notes
- You must use either Freely Vegan gluten free flour or DIY flour made with The Plant Based Egg in this recipe. Freely Vegan all-purpose flour is available from either freelyvegan.com or Amazon. These flours are quite different from other GF flours and work without xanthan gum, guar gum, or eggs.
- You can use a combination of distilled white vinegar and lemon juice instead of the vitamin C crystals. To do this, reduce the seltzer water to 570 grams and add 15 grams of lemon juice and 15 grams of distilled white vinegar to the well with the bubbly yeast after the five minute wait and right before stirring the liquid into the flour.